Virtual Firewall Deployment with pfSense Home Lab
Brief Summary
In this project the goal is to learn more about configuring firewalls and how they are deployed within enterprise environments.
I’ll be mocking an example network with two subnets, a DMZ and a LAN. The DMZ will have an apache server running on ubuntu server 24.04 and the LAN will have a windows 10 workstation. The focus here will be on configuring the pfSense firewall and running different kinds of tests on the firewall.
The scenario is deploying a firewall for a small business network. This business’ network has a LAN for the internal office network and a DMZ which contains a server running a externally facing website.
Objectives of this project
- Deepen understanding of firewalls
- Learn more about firewall configurations
- Learn more about testing firewalls to see how they respond to different threats
Network setup
VM setup
We’ll have 3 custom networks in VMware, em0, em1, em2. em0 will be our WAN which will be Host-Only to provide our firewall access to the internet, you could also use NAT instead.
(I won’t go into too much detail on setting up the VMs so I can focus more on the firewall configuration)
pfSense Firewall
Resources:
- 1 vCPU
- 4GB RAM
- 20GB Disk Space
Network adapters:
- 1: Bridged (Internet Access)
- 2: Host-Only (DMZ)
- 3: Host-Only (LAN)
Ubuntu server
Resources:
- 1 vCPU
- 4GB RAM
- 20GB Disk Space
Network adapters:
- 1: Host-Only (DMZ)
Windows 10 workstation
Resources:
- 2 vCPU
- 4GB RAM
- 60GB Disk Space
Network adapters:
- 1: Host-Only (LAN)
pfSense setup
- For WAN interface select network adapter which is connected to the custom bridged network
- For the next step keep the defaults, DHCP is fine and we won’t worry about the VLAN tagging and we don’t want to use a local DNS resolver.
- For WAN interface select the network adapter which is connected to the custom host-only network representing the LAN
- The defaults here again are fine, we’ll use static for the interface rather than DHCP so its easier to manage
- Continue through the installer without changing any of the defaults until the installation of the pfSense CE software is finished
Windows 10 setup
On the windows 10 VM we’ll set a static IP, navigate to the IPv4 properties for the network adapter and use the following configurations
1
2
3
4
5
IP Address: 192.168.1.128 (Or any other valid IP within the subnet)
Subnet mask: 255.255.255.0
Default Gateway: 192.168.1.1 (IP for pfSense LAN interface)

Preferred DNS server: 192.168.1.1
Now when visiting the IP of the pfSense LAN interface in our browser we should get a login page which we can login to using pfSense default credentials (admin:pfsense) and then start editing the rules.
Create the following rule to allow internet access:
- Destination: any
- Source: LAN subnets
- Protocol: Any
- Port: Any
We should also now have internet access which we can check by pinging 8.8.8.8 to which we should get replies and we can check DNS is working by navigating to google.com.
Before moving on to the ubuntu server add a network interface for em2 which is the interface for the network for the DMZ (Interfaces -> Assignments). For this network interface set the IP address to 192.168.2.1 and enable the interface. Then set a rule to allow all DMZ to WAN traffic for any protocols, this rule will be the same as the rule we created earlier for the LAN network.
(We’ll change this later when hardening the firewall)
Ubuntu server setup
Once on the ubuntu server use the following /etc/netplan/50-cloud-init.yaml configuration
1
2
3
4
5
6
7
8
9
10
11
12
13
network:
    ethernets:
        ens33:
            dhcp4: false
            addresses:
             - 192.168.2.124/24
            routes:
             - to: default
               via: 192.168.2.1
            nameservers:
                addresses:
                 - 192.168.2.1
    version: 2
This sets a static IP of 192.168.2.124 to the ubuntu VM and sets the default route to 192.168.2.1 and DNS recursive resolver to 192.168.1.1 (so the firewall handles DNS queries). Apply the configuration using sudo netplan apply and we should be able to ping our firewall (192.168.2.1) and googles DNS server (8.8.8.8).
Now install Apache on the ubuntu
1
2
sudo apt update
sudo apt install apache2
Firewall hardening
I’ll be using guidance from the CIS pfSense Firewall Benchmark and Netgate’s firewall best practices. From these here are the principles I will be following for hardening our firewall:
- Least privilege: Limit access to firewall management and restrict unnecessary services.
- Default deny: Permit only the bare minimum required traffic for the needs of a network
- Keep it short: Utilize aliases to keep the ruleset as short as possible.
- Defense in Depth: Apply multiple layers of security to protect the network.
- Network Segmentation: Separate networks to minimize lateral movement.
- Visibility and Logging: Enable and monitor logs to track traffic and detect anomalies.
We’ll start with deleting all rules for both the DMZ and the LAN apart from the anti-lockout LAN rule.
Now we are starting from scratch and all traffic from these networks is dropped by default (except traffic from the LAN to the web interface) we can begin building our rules based on the needs of each network.
We’ll start with the following basic set of requirements:
- Employees need to access the internet to work.
- Web servers on the DMZ need to be able to accept HTTP / HTTPS request from the internet.
- Web servers on the DMZ need to be able to access the internet to get security updates.
- Employees should only be able to access externally facing services on the DMZ.
LAN interface firewall rules
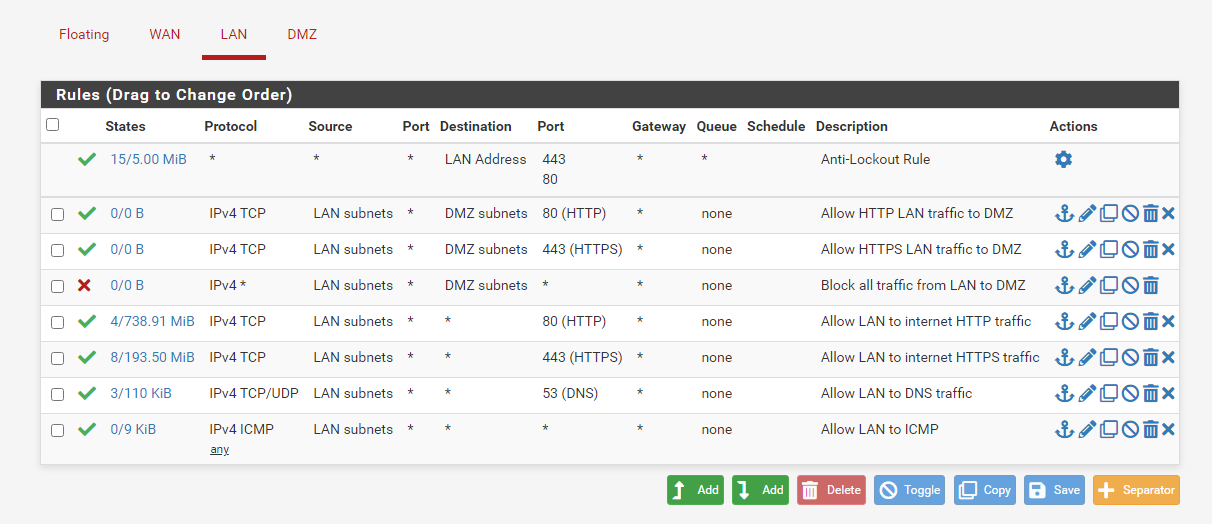
First to allow employees to access websites on the internet create a rule to allow IPv4 TCP traffic from LAN to ANY for destination port 80, then copy this rule but with port 443.
We also need a rule to allow for DNS queries, create a rule to allow IPv4 TCP/UDP traffic from LAN to ANY for destination port 53.
And we’ll also create a rule to allow for ICMP pings for testing purposes, create a rule to allow ICMP traffic from LAN to ANY
The next rule we’ll create will block all traffic that isn’t HTTP or HTTPS for LAN -> DMZ. To do this we need 2 rules; one to allow traffic to ports 80 and 443 for devices on the DMZ and one to block all traffic.
Create a rule to allow IPv4 TCP traffic from LAN to DMZ for ports 80 and 443, place this rule at the top of the list.
Then create another rule to block all traffic from LAN to DMZ and place this rule right below the previous rule we created. This rule will be matched after the previous rule.
This is what the ruleset for the LAN interface looks like so far:
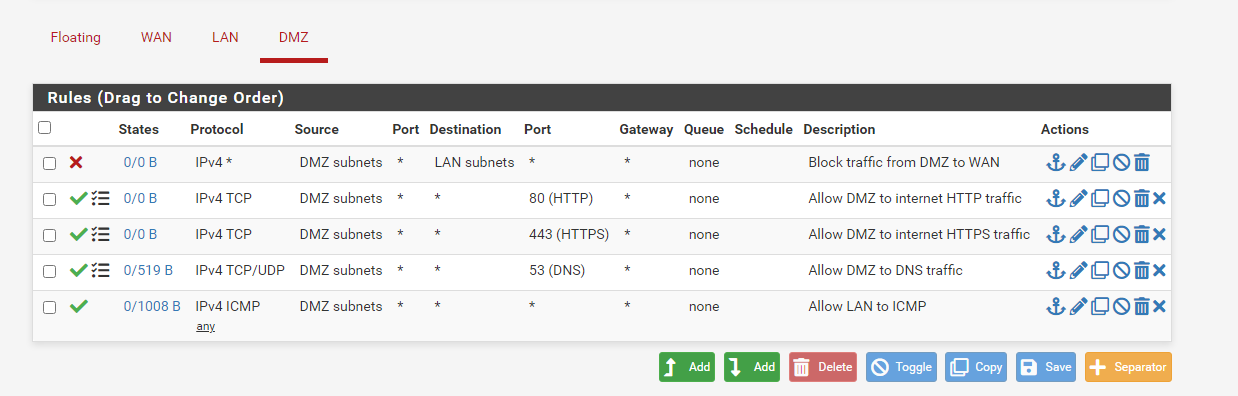
DMZ interface firewall rules
For the DMZ interface we will be using the same rules, we want to allow internet access, DNS queries, and ICMP pings. We also want to add another rule to block the DMZ communicating with the LAN to prevent any potential attacks from the DMZ from propagating to the internal network. The order of rules here matters since pfSense executes firewalls rules top to bottom and uses the first rule that matches we should place our rule blocking DMZ -> WAN traffic at the top of our list. Our ruleset for the DMZ interface now looks like this
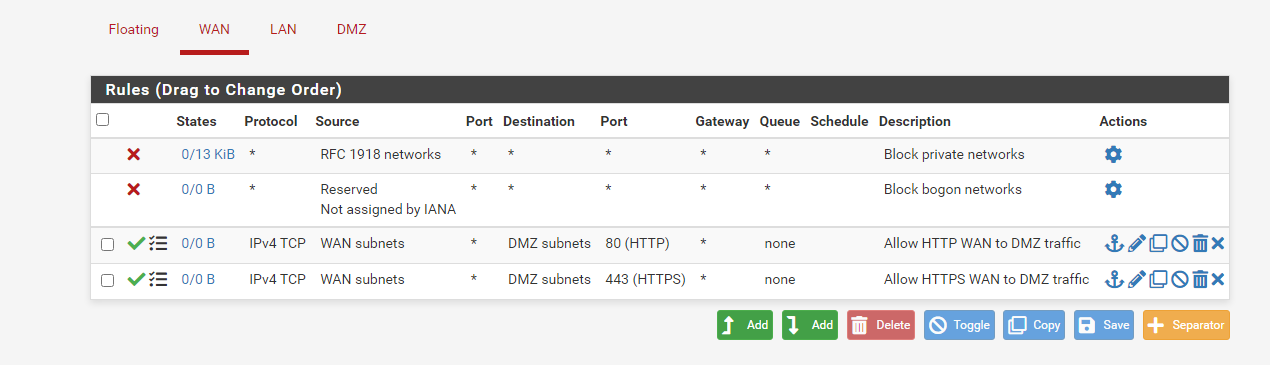
WAN interface firewall rules
For the DMZ to be able accept inbound traffic we need to create a rule to allow traffic from the internet to the DMZ on the WAN interface. Create a rule to allow IPv4 TCP traffic from WAN -> DMZ for ports 80 and 443.
Logging
Now to implement logging for the different rules, its important we log only traffic worth logging so we don’t end up with a huge load of useless logs. Employees will be accessing the internet regularly so we’ll avoid logging all LAN -> internet traffic. We’ll enable logging for WAN -> DMZ traffic since this is likely the most probable attack vector and we’ll also enable logging for DMZ -> WAN traffic to monitor which servers access the web as well as DNS queries made by devices in the DMZ. This is because the majority of outgoing traffic from our DMZ will be fetching security updates and patches and this will be regular but not extremely frequent and an attacker may perform C2 with a compromised server in the DMZ via the web.
The enable logging checkbox is in the rule settings.
Port forwarding
There’s a small step to complete before we can start testing the firewall, we want to ensure that the apache service is accessible from devices on the WAN. To do this we need to setup a port forwarding rule. In Firewall > NAT > Port Forward add a new rule for the WAN interface.
The last step to do to enable us to access the DMZ from our network is disable the WAN interface rule that is enabled by default which blocks connections from private networks. This rule is enabled by default since the WAN is usually connected to the internet and not a private network but in the case of this home lab since we are using a bridged interface we want to disable this rule so we can access the DMZ from our host machine. The other way to do this would be to enable port forwarding on our router to the pfSense firewall but since it’s just a home lab we won’t bother with doing this.
Now when visiting port 80 of the WAN interface of the firewall we should get the apache server.
Testing the firewall
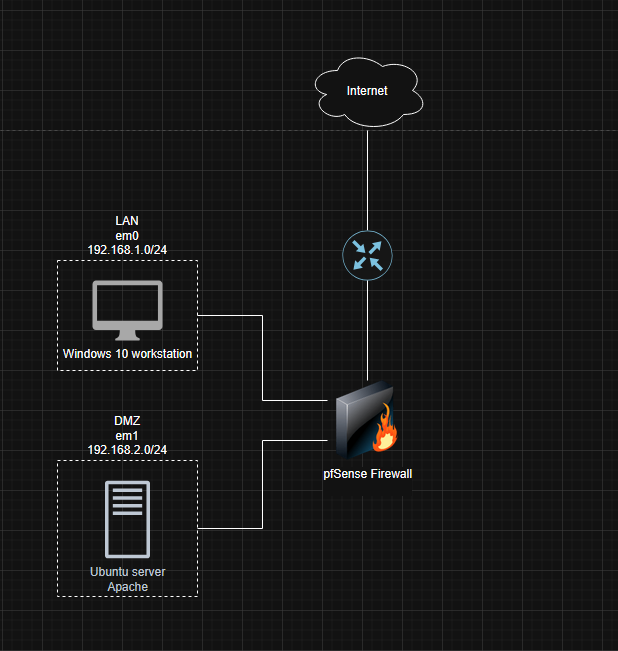
So far we’ve setup the following network
We’ve configured the firewall to only allow:
- LAN -> WAN
- DMZ -> WAN
- WAN -> DMZ
To test the firewall we want to check what is reachable and what isn’t from different parts of the network, to do this we’ll create a script which will perform a series of pings to test connectivity. We’ll make the script take in an argument which tells it where the script is being ran from. The script I created for testing is available at https://github.com/JB02S/pfsense-testing-script.
Issues I had
When I would start up the VMs sometimes internet wasn’t working, this was due to “Automatic” being selected for the bridged network adapter. It wouldn’t always select the network adapter on my PC which was connected to the internet. After setting it to the correct adapter this problem didn’t happen again.
When I would allow LAN -> WAN / DMZ -> WAN traffic I couldn’t get internet on devices within these subnets but when I allowed LAN -> ANY / DMZ -> ANY traffic I could. I was confused by this since I thought that the WAN interface was the interface connected to the internet. I then realised this is because my WAN interface isn’t connected directly to the internet but to my private network so it was only allow traffic to and from 192.168.0.0/24.
I got mixed up with DNS and DMZ which led to around 40 minutes of troubleshooting. I had LAN -> DMZ traffic allowed instead of LAN -> DNS traffic.
When setting up the port forwarding to allow traffic from the internet to the DMZ I created the rule but still couldn’t access the DMZ from an external network. I went through the logs and realised this was because of a default rule on the WAN interface which blocks connections from private networks, this is enabled by default as typically the WAN interface is connected to the internet but for this lab to work we need to disable it.