Active Directory Home Lab
Brief summary
I decided on doing this project to deepen my understanding of securing and monitoring Microsoft Active Directory (AD). I wanted to improve my understanding due to the fact of how widely used AD is, and also the importance of securing AD within corporate environments to protect digital information.
Objectives of this project
- Deepen understanding of deploying and securing AD
- Setup an AD network
- Deploy Splunk SIEM on an ubuntu server to monitor machines on this AD network
- Setup sysmon on machines on AD network
- Setup splunk forwarder to forward sysmon logs to SIEM
- Generate logs from mock brute force attack
- Generate telemetry using atomic red team (ART)
Network setup plan
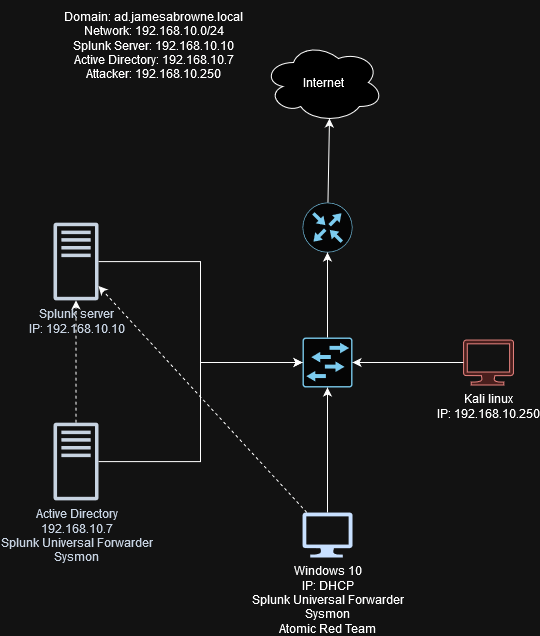
Also note the firewall in the diagram represents the local firewalls on the windows / ubuntu machines, there is no seperate logical firewall setup
Project setup
(Note this project setup guide assumes a basic knowledge of virtualisation with Oracle VirtualBox and also a basic knowledge of networking)
VMs Setup
Will be using Oracle VirtualBox for the VMs,
Will need to setup 4 VMs, as stated in the network setup diagram
- Ubuntu server (for splunk)
- Windows server (for AD)
- Windows 10 machine
- Kali machine
(Won’t be going into detail on each particular setup for VM apart from the key information)
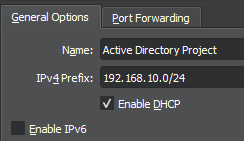
Setup a new NAT network for the project in VirtualBox, set the network ip to the network ip defined in the network diagram (192.168.10.0/24), also enable DHCP
For the windows server select Select Standard Evaluation (Desktop Experience) OS
For every VM just follow the basic installation process from the iso
Set every VMs network adapter to connect to NAT network defined earlier (192.168.10.0/24)
Ubuntu server
Change DHCP setting on ubuntu to false and set a static ip to the ip defined in the diagram (192.168.10.0/24), this can be done my changing /etc/netplan/00-installer-config.yaml file to the following
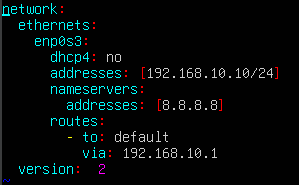
- dhcp4: no (sets dhcp to false and use static ip instead)
- addresses: [192.168.10.10/24] (sets static ip to 192.168.10.10 and defines network range)
- nameservers defines DNS servers to use, in this case we use google DNS server (8.8.8.8)
We also need to install guest additions for virtualbox and add our user to the vboxsf group, we can do this by executing the following commands
1
2
3
4
sudo apt-get install virtualbox-guest-additions-iso
sudo apt-get install virtualbox-guest-utils
sudo reboot
sudo adduser ubuntu vboxsf
And proceed to add a shared folder on the host for the VM
Now create a directory for the shared folder on the VM and mount it using
1
sudo mount -t vboxsf -o uid=1000,gid=1000 <Share folder on host> <Share folder on VM>
Now we install splunk enterprise for linux from https://splunk.com on our host machine and move the deb file to the shared folder and proceed to install splunk
1
sudo dpkg -i splunk-9.3.0-51ccf43db5bd-linux-2.6-amd64.deb
Now we need to run the splunk installer, open a bash shell as the splunk user and change to the bin folder in the splunk users home directory
1
2
3
sudo -u splunk bash
cd /opt/splunk/bin
./splunk start
Now we want to enable the splunk service on startup, we must first exit out the splunk user
1
2
exit
sudo ./splunk enable boot-start -user splunk
Windows 10 machine
We are using DHCP to assign the IP of the local machine, however if the ip is the same as the ip we are going to use for either the kali machine or the ADDC then set it to a static ip which is still within the ip range of the network (192.168.10.0/24). How to set static IP on Windows 10
We now need to install splunk universal forwarder, we can install this from https://splunk.com. Install Universal Forwarder for windows 10.
When running the installer for the forwarder make sure on-premise splunk enterprise instance is selected and set our receiving indexer to the static ip of our ubuntu server (where our splunk server is running)
Now we need sysmon for logging which can be installed from here. Install and extract the zip
For our sysmon config we will be using sysmon olaf config which can be downloaded from the sysmon configuration repo here, download the file “sysmonconfig.xml”
Now open an admin powershell and navigate to the extracted zip and run the executable with the configuration file specified using the -i flag e.g
1
.\Sysmon64.exe -i <path to sysmonconfig.xml>
Run through the installer process
Now we have the forwarder and sysmon installed we need to configure the splunk forwarder on what logs to send to our splunk server. Copy the file
1
C:\Program Files\SplunkUniversalForwarder\etc\system\default\inputs.conf
To
1
C:\Program Files\SplunkUniversalForwarder\etc\system\local\inputs.conf
We do this for good practice since the inputs.conf file under the default directory is suppose to not be changed so it can be used as a backup.
We want to send events related to Applications, Security, System, and Sysmon. So we change the inputs.conf file in the local directory to the following
1
2
3
4
5
6
7
8
9
10
11
12
13
14
15
16
17
[WinEventLog://Application]
index = endpoint
disabled = false

[WinEventLog://Security]
index = endpoint
disabled = false

[WinEventLog://System]
index = endpoint
disabled = false

[WinEventLog://Microsoft-Windows-Sysmon/Operational]
index = endpoint
disabled = false
renderXml = true
source = XmlWinEventLog:Microsoft-Windows-Sysmon/Operational
(We will need to create the endpoint index later to allow splunk to receive these alerts and format them correctly)
While not necessary it’s also important to change the user which runs the splunk forwarder service to ensure splunk has the necessary permission to collect logs, to do this we open services on our windows machine, find the splunk forwarder service and open properties, then in the log on tab select the local user account option. After this restart the service
Setting up endpoint index on splunk
Navigate to the splunk web server via the windows 10 machine and log on
Go to Settings > Indexes > New Index
Name the new index endpoint and save
We created the index but still need to format the received data. So go to Settings > Forwarding and receiving > configure receiving > new receiving port
Set receiving port to port specified during splunk installer setup (default is 9997)
Our splunk server should now be receiving log data from our windows 10 machine
ADDC Setup
Set static ip to ip specified in network setup diagram, can be done using the same steps when setting static ip of windows 10 machine
We could also change the server name at this stage from the server manager, I changed it to ADDC01.
Now we can start the process of setting up AD
Go to Manage > Add Roles and Features
On Installation type select Role-based (We would like RBAC in our AD environment as we want to manage permissions based on user roles)
In server selection select the only AD server we will have on our network
Now for server roles select active directory domain services (AD DS), more information about AD DS here
Now simply proceed to the installation
So all we have done up to this point is setup AD DS on our server which allows our server to handle directory services (AD functions, e.g user and group management), however are server doesn’t had the ability to authenticate users or manage the AD database yet, for this we need to promote the server to a Domain Controller (DC)
Go to the flag icon to the left of Manage and select Promote this server to a Domain Controller
Select Add a new forest (as we are creating a brand new domain) and select your domain name (in my case jamesabrowne.local)
(Small note once you get to Paths these are the paths used to store our DB files named NTDS.dit, and since our DC will manage user authentication this DB file will also store password hashes for all users within the AD environment, which makes it a prime target for attackers)
Continue through the wizard and then press install, the machine will restart and when you login you will notice you have your domain before the Administrator account username (in my case JAMESABROWNE\Administartor)
Now we have promoted our server to a DC we need to create some users
Go to Tools > Active Directory Users and Computers
If we go to <your domain> > Builtin we can see the builtin user groups, we can see information about the groups such as members, permissions and other groups that this group is in by right clicking > properties
We can also create a user directly from the <your domain> > Builtin > Users, however to mimic a real-world example we will first create an organisational unit by right clicking <your domain> > New > Organisational unit. In my case I named it IT
Now right click on the new unit and select New > User and input a username and create the new user
In my case I also created another organisational unit with another user in it
Adding sysmon and splunk forwarder to windows server
We also want to setup sysmon and the splunk forwarder on the windows server, the steps for this are identical to the setup on the windows 10 machine.
Adding Windows 10 machine to AD network
On the Windows 10 machine
We will first need to set the DNS server to the domain of our DC, since the windows 10 machine will not know how to resolve the DC’s domain
Follow the same steps to set the static IP done earlier but instead of changing the IP set the DNS server to the IP of the DC in my case 192.168.10.7
Now go to This PC > Properties > Advanced System Settings
Then on the Computer Name tab select Change and then select Domain and enter your domain
For now enter the Administrator account credentials so we have the correct permissions, in a real world example there would be a specific set of users performing this function
After successfully connecting restart the machine and when at the log in page select Other user and we should see that Sign in to is pointing to our domain, sign in using the credentials for the account we created in the IT organisational unit
Brute-force attack simulation in kali
On the kali machine
First we will set kali to the static IP defined in the network setup diagram, to do this
- Right click ethernet icon on the task bar
- Click edit connections
- Select the first wired connection
- Select the cog icon
- Select IPv4 settings
- Set Method to Manual and enter ip, netmask, gateway, and DNS servers
- Right click ethernet icon again and select disconnect, then select the wired connection
We will be using hydra to perform the brute-force attack
Just for the demo we will use the first 20 lines of the rockyou wordlist
1
2
3
4
5
6
cd ~
mkdir adproj
cd adproj
sudo gzip -dv /usr/share/wordlists/rockyou.txt.gz
head -n 20 /usr/share/wordlists/rockyou.txt > passwords.txt
echo "<The user passwords for the AD accounts we created>" >> passwords.txt
On Windows 10 machine
The network facing service which we are to perform the brute-force on is RDP
To setup RDP, go to This PC > Properties > Advanced System Settings
Go to the Remote tab then under Remote Desktop select Allow remote connection to this computer
Then select Select Users > Add and then enter the usernames of the two users
Back on the kali machine
Now on the kali machine if we enter the command
1
hydra -l <Account username> -P <Windows 10 machine IP> rdp
We should see that we find correct credentials
Analysing SIEM logs
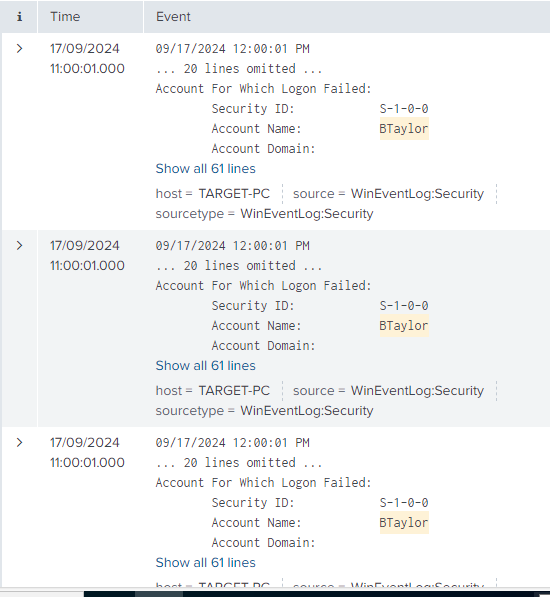
Access the splunk web page from any of the VMs on the network and log in, we should see that if we search with index=endpoint <Account username> we should see some log data, if we filter for event code 4625, we should see 20 events as we used 20 incorrect passwords when brute forcing and these should all be within a close timeframe of eachother.
 (When filtering for
 index=endpoint BTaylor on my setup)
When analysing one of the logs we can see information about the source of the attempted network connection, the domain, the source workstation name, etc
In a real world example these logs would obviously be a sign of a brute force attack
Running Atomic Red Team (ART) tests
Before Installing ART we will need to turn off some of Windows’ security features. Open an admin powershell and enter
1
Set-ExecutionPolicy Bypass CurrentUser
This allows us to run any script as the current user without restrictions and prompting for confirmation
Now go to the start menu and search for Windows Security > Virus and Threat protection > Manage Settings > Add or remove exclusions > Add an exclusion > Folder
Then select the C Drive
ART Installation
Within the admin powershell execute the following commands as defined in the Invoke-AtomicRedTeam wiki available here
1
2
IEX (IWR 'https://raw.githubusercontent.com/redcanaryco/invoke-atomicredteam/master/install-atomicredteam.ps1' -UseBasicParsing);
Install-AtomicRedTeam -GetAtomics
Now we are able to see the different tests available to us within the
C:\AtomicRedTeam\Atomics
directory, where they are categorised by their MITRE ATT&CK ID’s
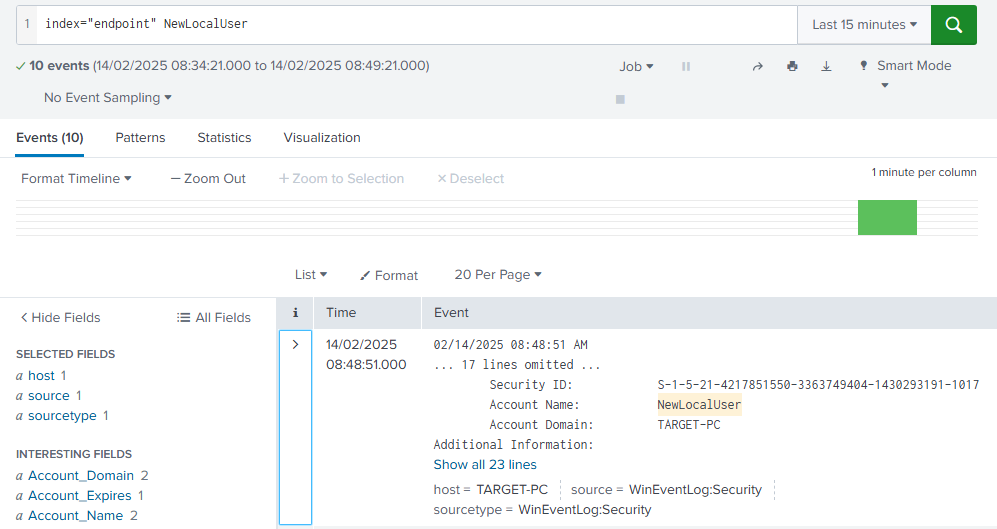
Lets run a test to test the MITRE ATT&CK Technique T1136 and we will test the sub technique T1136.001 which corresponds to the Create Account (Local) technique.
To use the command we run the following command in our admin powershell
1
Invoke-AtomicTest T1136.001
This command creates the account NewLocalUser to test technique T1136.001 and we can search for this in splunk with the query
1
index=endpoint NewLocalUser
There should be an event for this but it might take a minute or so to appear in the SIEM
Great, now we can test if our machines can detect certain kinds of attacks and events from ART tests or running our own commands from the kali VM. From this we can patch the holes in our security setup.
Running different ART tests
T1140
T1140 corresponds to the Deobfuscate/Decode Files or Information technique. Attackers will use this technique to reverse or remove obfuscation, encryption, or encoding applied to data, scripts, or files to make them usable during an attack. Malware is often delivered in an encoded form to avoid detection and once in the system the attacker will decode it for execution. Lets run the test:
PS C:\AtomicRedTeam> Invoke-AtomicTest T1140
PathToAtomicsFolder = C:\AtomicRedTeam\atomics
Executing test: T1140-1 Deobfuscate/Decode Files Or Information Input Length = 27648
Output Length = 38072
CertUtil: -encode command completed successfully.
Input Length = 38072
Output Length = 27648
CertUtil: -decode command completed successfully.
Exit code: 0
Done executing test: T1140-1 Deobfuscate/Decode Files Or Information Executing test: T1140-2 Certutil Rename and Decode
1 file(s) copied.
(null)
(null)
(null)
(null)
(null)
(null)
Exit code: 0
Done executing test: T1140-2 Certutil Rename and Decode
PS C:\AtomicRedTeam>
The ART T1140 test checks for this using the certutil command and we can see the command it ran was CertUtil: -decode command completed successfully.. We can use the following query in splunk to check if it was logged
1
index=endpoint certutil
After waiting a few minutes there was no logs sent to the SIEM which is something we should patch, it’s likely that it was logged but our current splunk forwarder configuration isn’t configured to forward these logs. To fix this we could find where the event for this command would be logged and configure those log files to be forwarded to splunk. We’ll briefly run a couple other tests just to check the output.
T1201
T1201 - “Adversaries may attempt to access detailed information about the password policy used within an enterprise network or cloud environment.”
PS C:\AtomicRedTeam> Invoke-AtomicTest T1201
PathToAtomicsFolder = C:\AtomicRedTeam\atomics
Executing test: T1201-6 Examine local password policy Force user logoff how long after time expires?: Minimum password age (days):
Maximum password age (days):
Minimum password length:
Length of password history maintained:
Lockout threshold:
Lockout duration (minutes):
Lockout observation window (minutes):
-
Windows
Never
1
42
7
24
Never
10
10
WORKSTATION
Computer role:
The command completed successfully.
Exit code: 0
Done executing test: T1201-6 Examine local password policy - Windows Executing test: T1201-7 Examine domain password policy - Windows
The request will be processed at a domain controller for domain jamesabrowne.1 Force user logoff how long after time expires?:
Minimum password age (days):
Maximum password age (days):
Minimum password length:
Never
1
42
7
Length of password history maintained:
24
Lockout threshold:
Lockout duration (minutes):
Lockout observation window (minutes):
Never
30
30
The command completed successfully.
Computer role:
PRIMARY
Exit code: 0
Done executing test: T1201-7 Examine domain password policy Windows
No logs were forwarded to splunk which identified this behaviour, here we could consider putting access restrictions on who can access password policy data and forward relevant logs for when this data is accessed to splunk
T1202
T1202 - “Adversaries may abuse utilities that allow for command execution to bypass security restrictions that limit the use of command-line interpreters”
1
2
3
4
5
6
7
8
9
10
11
12
13
14
15
16
17
PS C:\AtomicRedTeam> Invoke-AtomicTest T1202
PathToAtomicsFolder = C:\AtomicRedTeam\atomics
Executing test: T1202-1 Indirect Command Execution Exit code: 0
-
pcalua.exe
Done executing test: T1202-1 Indirect Command Execution - pcalua.exe Executing test: T1202-2 Indirect Command Execution forfiles.exe Exit code: 0
Done executing test: T1202-2 Indirect Command Execution forfiles.exe Executing test: T1202-3 Indirect Command Execution - conhost.exe Exit code: 0
Done executing test: T1202-3 Indirect Command Execution -conhost.exe Executing test: T1202-4 Indirect Command Execution - Scriptrunner.exe Script filename is C:\Windows\System32\calc.exe
Script arguments are
Wait is False
Timeout is -1
Rollback is False
Number of scripts to run: 1
Script is C:\Windows\System32\calc.exe Wait is False
RollbackOnError is False
Exit code: 0
Done executing test: T1202-4 Indirect Command Execution PS C:\AtomicRedTeam> - Scriptrunner.exe
Finishing up
This project was done to improve my understanding of active directory as well as learning how to use ART tests in order to identify gaps in security. Improvements to this project which I may do in the future would involve detection engineering / patching systems based on what gaps we find when running the ART tests in order to improve our security.